I took my camera and went in to the Swedish woods to get some nice rock and moss pictures to start with :)
My procedure in short:
There are probably other and better ways to do this, but here is how I do. Any suggestion for improvements are welcome.- Make image seamless
- Make normal (also seamless)
- Save as dds files with the NVIDIA plugin.
- Get in to Creation kit
Make the image seamless
1. Open your image in Photoshop. I use a image that is 1024x1024 pixels in size.2. Under Filters, Other choose Offset. Choose to offset the image with 1/2 of the height and width. For a 1024x1024 image that is 512. Select Wrap Around.
3. Now you will have an image with distinct borders you need to fix. I usually use the clone tool to substitute the sharp borders with appropriate sections of the image until I have something I like.

4. Save as yourtexture.dds. Use the DXT1 settings or DXT5 if you have added an Alpha channel.
An alpha channel will make part of the texture transparent. I plan to use this for some mosses where I want the underlying stone to show in patches.
Make a seamless Normal map for the texture
A normal gives the image a sense of depth even if it's a flat surface. Normal can be made in PS with the NVIDIA plugin.1. Open your texture image in PS. Make sure there is only one layer, go to Layer and choose Flatten Image.
(Optional, go to Adjustment, Black white, choose default settings. For me it's easier to see if it's in black and white.)
2. Duplicate the layer and make the copy darker (-150 in Brightness). With the erase tool remove parts of the dark layer so the the light layer shows. Make sure that the removed parts of the dark layer is seamless by using the Offset tool (same procedure as with the texture), when you are happy, offset it again to get back to the original position. Merge the light and dark layer.
3. To make the Normal map go to Filter, NVIDIA tools, Normal Map Filter. Invert X and Y. Change the Scale, higher numbers give larger impact. I use a scale between 20-50. Too much scale will give weird artifacts in the texture.
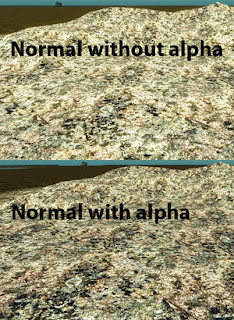
4. Optional: Add an Alpha channel. No alpha channel in the normal map will make the texture appear more light and shiny.
5. Save as yourtexture_n.dds, Use the DXT1 settings or DXT5 if you have added an Alpha channel.
How to get the landscape texture in to your mod
1. Copy your landscape texture and normal to your Skyrim folder, under Data/Textures/Landscape2. Open up the Creation kit and load your mod esp as active.
3. In the Object window, go to Miscellaneous and TextureSet, right click in the window and choose New.
4. Fill in the name you want for your texture set and add textures to Diffuse and Normal with the Edit button (browse to the Landscape folder). Press OK.
5. Go to LandTextures (in Miscellaneous), right click and select New.
6. Give the texture a unique ID, change the Material Type and Friction. Select the Texture Set you just made from the drop down menu. Press OK.
Now you have your custom landscape texture in the CK ready for use :)
Don't forget to save.
Texture too bright in game?
There are some things you can do if the texture looks too bright in the game.First add an Alpha channel to the normal. This will make the image darker and less shiny.
To make the alpha channel in photoshop, click on Channels (next to Layers), click the right most symbol (an arrow with lines next to it), select New Channel. Call it Alpha 1 and click "Masked areas", this will give you a black alpha channel. Save normal as dds with DXT5 settings.
Next thing you can do is make the texture darker. I do this with the Brightness/Contrast tool in PS, by lowering brightness by -50 or more.
Now all I have to do is make a lot of landscape textures for Hoddminir. Hopefully I can release a custom land texture pack as a modders resource soon :)
/E


Thank you so much - finally found real answers to some of my 'How to's'!
ReplyDelete