In short these are the steps I will do:
Part I: textures
- choose a appropriate existing model
- make the texture
- test that it looks good in game
Models
I'm going to re-skin an existing model, but to know what grass model to choose I need to know what planes the models have? What will fit with the plant I have in mind?
|
|
|
||||||
|
|
|
If you want to know how all the grass models look, please download this file. It contains jpg images of all grass with all of the planes showing.
For this particular plant I chose the "tundragrass03" model and texture (after some trial and error).
Making your DDS textures
I have worked in Photoshop, and to be able to open .dds files I needed to download Nvidia dds plugin for Photoshop.You can make a texture from scratch, or completely modify an existing texture. To get the original textures unpack Skyrim.bsa, if you have not done this before, you can do it with for example BSAopt. The grass textures are found under Textures\landscape\grass in the BSA. Make a copy of the grass texture you want. I will use "tundragrassobj03.dds"
1. Open the dds file in PS with the settings Load Using Default Sizes, unchecked Load MIP maps.
2. I like to have a higher resolution than vanilla so I change the image size to 1024x1024 (normal is 512x512).
3. Now comes the creative part. I pasted in a picture I have of a flower, clean away all the surrounding nature, scale it to fit the size I want. In the beginning I fell for the temptation to use a lot of flowers, but less is more.
4. Keep the flowers and background color in separate layers for now. I painted the background in a shade of green, and another color matching the flowers around them. Some of the background color will show depending on the alpha channel.
 5. To see only the plant in game and not the background you need to make/change the alpha channel.
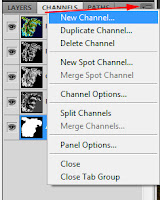
 There are probably several ways to do this, here is how I do it. Click on Channels (next to Layers), if you used an existing texture dds file it already has an alpha channel, you need to paint it all black.
But if you are making a new alpha channel, click the right most symbol, select New Channel. Call it Alpha 1 and click "Masked areas", this will give you a black alpha channel. Have the alpha channel deselected for now.
6. Now go back to Layers and make a duplicate of the flower layer. Go to Filter/Blur/Average and make the layer completely white by enhancing the Brightness to max (Image/Adjustment/Brightness).
7. Select the whole layer (Ctrl A), copy (Ctrl C). Go to channels, select the Alpha channel, paste. You may have to move the alpha image down so it covers the flower image (press V to select the move tool, then move with arrows). When you are happy with the position you can deselect, and deactivate the alpha layer.
|
8. Delete the white flower level you just made (step 6). Flatten image, then save as .dds with these settings:
With these settings. the Alpha layer will be used, and it will make and save 10 MIP maps. MIP maps are lower resolution images that show when you see that object from afar.
EDIT:
To reduce the load on the graphic card it is important to save in the right format. There is an excellent forum post on this subject.
What save settings to use when:
* Generate mipmaps
* Save textures with an Alpha channel (some parts of the image is transparent) as DXT3 or DTX5 and without Alpha channels as DXT1
* Save normals as DXT5
9. To test in game, take the .dds file you just made, name it as the original texture, in this case tundragrassobj03.dds and copy it to Skyrim\Data\Textures\landscape\grass. The texture will now override the original and show up instead of it in game. (Deleting this new texture will make the game show the original texture again.)
10. Open the CK and load your mod.
11. In the Object window (WorldObjects/Grass/Landscape) you can change the specific settings for your grass type, for me the "tundragrass03".
Density will determine how often the grass appears. At what Min and Max slope the grass will grow. The Position Range is how close grasses can be to each other. Wave Period determines how much the grass will move to simulate wind movement.
There is also a drop down menu on how the grass relates to water, in units below, above and so on. That can be very handy for underwater plants, or beach plants.
If you want a thick growth of your plant, have a high Density and a low Position Range. Grasses looks really good with a high Wave Period, but most flowers will look like they are just shaking, so I lower this to 50.
12. You need to paint the ground texture "LTundra01" somewhere in your mod, it has the tundragrass03 grass associated to it. Or take another texture (Miscellaneous/LandTextures) in the Object window, double click on it and the LandTexture window will open. Drag the grass from the Object window (WorldObjects/Grass/Landscape) to the LandTexture window in the "Potential Grass" list.
13. Save the mod and run in Skyrim to see how your plant looks.
Next step is to make permanent new models with the plants by re-skinning duplicated models, I will cover this in Part II, as soon as I have figured it all out :)
/E


No comments:
Post a Comment