Showing posts with label Height map. Show all posts

Thursday, May 24, 2012

Making a 16bit height map without Photoshop

I have been asked many times how to make a height map for Skyrim without using Photoshop. Unfortionally Gimp 2.8 do not support 16 bit images that are needed to make a height map and I have been trying to find some other program to do this with, and also make raw files that TesAnnwyn can read.
A solution it seams is a good but ugly program I used to work with called ImageJ. It is a Java program developed for scientific image analysis, and I used to measure root growth of mutant Arabidopsis with it. But it can also do what I need for Skyrim world creation, and it is free :)

Work flow


First make the height map in Gimp, save as 8 bit Tiff (see previous post for some guidelines)
Download ImageJ.
Open in ImageJ, change to 16 bit under Image -> Type, save as RAW.
Import the RAW image of the height map in GeoControl, under Generatio -> Terrain Import -> "Raw (16bit) from Carrara".
 
After you run the filters and have a terrain you like, export as a 16 bit RAW file.

To make the esp run TESAnnwyn, and because the image is to bright you have to use the scaling function. Exactly what scaling factor to use depends on how bright/high your world is, try what works for your world.
TESAnnwyn command line:
TESAnnwyn.exe -i Skyrim -p 1 -b 16 -d 4096x4096 -s 0.2 -x -64 -y -64  -h -22192 -w NameOfWorldspace YourImage.raw
 -i sets the game, -p RAW format, -b 16 bit image, -d size in pixels, -s scales the height range of the image, -x and -y cell offset in x and y directions. (See original post on -h values and the effect on sea levels.)

If anyone have found a better program or solution let me know.
/E


Tuesday, February 21, 2012

From Heightmap to Worldspace in Skyrim

Update (23 April 2013)
I’m sorry to be the bearer of bad news to all of you who wish to do really large worlds. There is a bug in the game engine that limits the functional size of a worldspace to 4096×4096 pixels (128×128 cells centered around cell 0,0). You can read more about what this bug effect here.
___________________________________________________________________

GK asked if I could outline the world and height map creation in more detail. I will try to make an in depth description of my workflow. There will be repetitions of some of the things I have described earlier, but perhaps in a more collected manner :)

(Updated 07 Dec 2013)
First a brief summary of the steps I go through from image to worldspace:
  • make Height map in Photoshop, save as TIFF
  • run it in Geocontrol 2 to make natural looking erosion
  • back to Photoshop to lower the gray scale color range, save as RAW
  • run TESAnnwyn to make an .esp
  • change LOD water, default water and land levels in CK
  • (convert esp to esm with CK)
  • Previous post: Make LOD meshes and Textures 

Making the height map: 
(Updated 07 Dec 2013)
The size in pixels of the image will determine the size of the world in Oblivion/Skyrim. The game is built up by quadrants, with 32 x 32 cells in each. One quadrant is 1024 x 1024 pixels. As a reference, Skyrim is 3808 x 3008 pixels (not all of which is playable). A world can be up to 16 x 16 quadrants (16384 x 16384 pix) in size, but due to the bug I mentioned in the header, worlds larger than 4 x 4 quadrants (4096x4096) will have huge problems.

There are several ways to make the height map, paint it yourself or use a landscaping software (like GeoControl, EarthEdit, etc).

EDIT
Don't have Photoshop? Well I think I found a way to still make a 16bit height map using Gimp, ImageJ and GeoControl. See new post.

This is my workflow for a 4096 x 4096 pixel sized world:

Photoshop
1.  I have made my original height map in Photoshop. Make a new image with the size you want, File -> New, size 4096 x 4096 pix, 16-bit and gray scale.
(Alternatively change the settings of an image you already have: Image -> Mode -> gray scale and 16-Bit.)
2.  Paint your terrain, I did this in layers, first black for the lowest to almost white as the top of a huge mountain. In the color tab you can chose the % gray scale. 100% is Black and 0% is White, so 50% gray has 50% black in it and so on. Whenever I talk about % gray, this is what I mean. 

(Oblivion and Skyrim can not handle a full range black to white height map like this, but I will fix this in a later step)
What can be good to know when you paint your world is where the sea level will be. When I paint my height map in 100-2% gray scale, the sea level will be between 89% and 90% gray scale. (This will change later to 99-98% when I lower the gray scale range to fit what Skyrim can handle.)


3.  Make sure to flatten the image if you worked in layers, Save file as TIFF

GeoControl
4.  Import Image to GeoControl2. Generation -> Terrain Import -> Image Import
GeoControl2 can only handle images up to 4096 x 4096 pixels. There are a lot of settings in GeoControl2, DON'T PANIC :) 
5.  Under the General tab -> Filter tab -> Add -> erosion system or erosion system inverse -> choose the erosion typed you want. I have used: Thin flow deep - inverse (all levels, strength 100), Thin flows sediment (only levels 1024 and 2048, strengths 40), Thin flow deep (all levels, strength 100) and Mountain ridged (all levels, strength 100).
I have uploaded some of my more used GeoControl settings if anyone want them.
EDIT:
Under the tabs Generation, General, General, General Settings, set "Random Noise up to level" to 0 and "Protect Terrain up to Level" to at least 64.
A high number for "Random Noise up to level" will introduce features that are not in your original map and a low number at "Protect Terrain up to Level" will lead to a flat terrain.
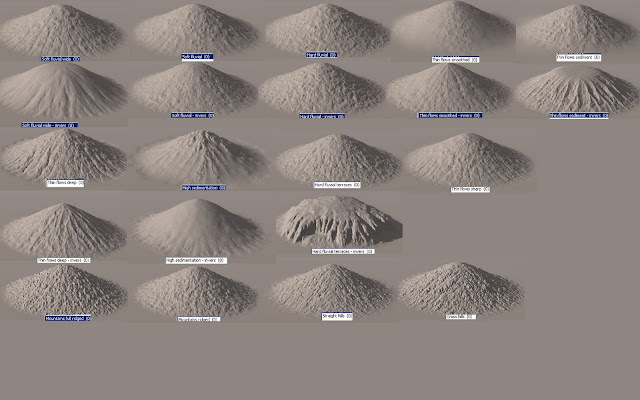
Some ideas on what the different settings can do

6.  Press Generate, depending on you computer this can take a lot of time.

7.  When it's done and you like the results go to Generation -> Terrain Export ->chose TIFF 16 bit greyscale.

Using GeoControl this way gives me less control over the final outcome of my world, but for me that's okay, in fact I have been happily surprised by my landscape when I'm in the game, as it turned out completely different to what I expected sometimes. 

Photoshop

8.  Open file in Photoshop, to flip the image vertical (TESAnnwyn will flip it back) go to Image -> Image Rotation -> Flip Canvas Vertical 
9.  The last thing we need to do is change the grayscale range. This is because Oblivion/Skyrim can only handle images that is from 0-76% gray (see previous post where I try to explain why and how I think it works, 1, 2, 3)
Go to Image -> Adjustments ->  Brightness/Contrast change to -150 brightness, and repeat again with -150 brightness. 
10.  Check with the Eyedropper tool that the lightest parts of the height map is not above 76% gray (With "above" I mean anything in the range 0-75%)
11.  Save as RAW, with the settings : Header 0, IBM PC
Now your height map is ready :)

Note: Important rules for the Heightmap
(Updated 07 Dec 2013)
1. If the change in height is too great there will be tears between cells!
This image posted by someone that had problems with this issue. Here you can see a classic example of this problem. Try making the height map image darker by lowering the brightness even more.

I have made some tests to see when I have too much height differences and get breaks between cells, I apologize if this is getting a bit technical. In the image below I have different gray scale color ranges from 100-95%, 100-90%, 100-85% and 100-80%. The color range is spread out over approximately 3 or 5 cells, and distinct color borders is where a break between cells will happen (*). Note that a change in height from 100-90% over 3 cells is almost a vertical wall :)  


2. Sea levels will be between 99% and 98% gray color in the finished height map (When using the setting -h -22192 in TESAnnwyn, and setting the default land levels to -27000, default water levels to -14000, see description below) 

TESAnnwyn: making the esp

I use the TESAnnwyn (Skyrim compatible version) to make esp from raw files, much easier than using the Creation kit. TESAnnwyn is a command line program that is really easy to use.
TESAnnwyn.exe -i Skyrim -p 1 -b 16 -d 4096x4096 -x -64 -y -64 -h -22192 -w NameOfWorldspace YourImage.raw
 -i sets the game, -p RAW format, -b 16 bit image, -d size in pixels, -x and -y cell offset in x and y directions, -h -22192 lowers the land, specific to work with water LODs in Skyrim.

h -22192 will give about 8000 units of the land under sea level, that is a lot. I like to have more above the sea level, so I use -16048 (2048 units under sea level) or -18096 (4096 units under sea level).

Now move the .esp to you Skyrim/Data folder.

(Updated 07 Dec 2013)
To make LODs work we have to change the default water and land settings for the worldspace. This can be done with the Creation kit (alt 1).
There are also other ways to do this, but you will only need them if you are doing a world that is larger that 4096 x 4096, and as mentioned above larger world spaces will have huge bugs.
The alternative methods are: Creation Kit with version control (alt 2), or an editor for Fallout New Vegas, FNVEdit (alt 3, you need a registered copy of Fallout New Vegas for it to work).

Alt 1) using the Creation kit (for .esp files)
For a world up to 4096x4096 pixels you can open and edit the esp in the Creation kit.
1.  In the Creation kit, open your esp (set as active).
2.  Under World -> Worldspace
3.  Select the worldspace, edit: LOD water height to -14000.0000, Default Land Height to -27000.0000 and Default Water Height to -14000.0000
Set Default Land Height to different thing dependent on value given in TESAnnwyn: -18096.0000 for h -18096 or -16048.0000 for h -1604.
4.  Save the esp

Update 2012-07-28
Alt 2) using Version Control (with the Creation Kit)
For a large worldspace like my 106384x16384 pixels there is no way I can open it as an active esp in the Creation kit, but you can be opened as an esm. What you need is to set up Version Control, follow Meagfaer's guide on how to do this: http://www.creationkit.com/Version_control

1.  Make the esp in to a esm, I use TES4Gecko. You also have to set up this esm according to the version control guide.
2.  In the CK, open only your esm (not the Skyrim.esm).
3.  Under World -> Worldspace
4.  Select the worldspace, edit: LOD water height to -14000.0000, Default Land Height to -27000.0000 and Default Water Height to -14000.0000
Set Default Land Height to different thing dependent on value given in TESAnnwyn: -18096.0000 for h -18096 or -16048.0000 for h -16048.
5.  Save the esp
6.  Load your esm and the new esp as active.
7.  Click on the version control botton (left of the load botton)
8.  Select the worldspace entry, click Check out. Select the worldspace entry again, click Check out.
9.  You can close the new window that pops up, and then select the your esm that the changes will be saved in to.
10. I was also asked if I would set the ID for WaterType and LOD WaterType, choose Yes.
11. Choose NO when asked about Check In Data files.
Now the esm has changed water height and so on.

Alt 3) using FNVEdit (for esp and .esm files)

1.  Put the esp file in the FalloutNewVegas/Data folder, open FNVedit and select the file
2.  Change the LOD water height to -14000.0000, Default Land Height to -27000.0000 (alt -16048.0000 or -18048.0000 ) and Default Water Height to -14000.0000.
3.  Close the FNVEdit and wait for it to save. It will create a backup and a save file. Rename the save file to .esm again.

(Updated 07 Dec 2013)
Optional: Converting the esp to an esm
You can trick the Creation Kit into making a functional esm.
1. Make a copy of your esp file and rename the extension to .esm
2. Open the new file as active in the CK, the file will still be listed among the esp as a plugin.
3. Save. The CK will now make the adjustments needed to make the file a proper esm. Next time you open the CK, the file will be listed as an esm.

Now you are ready to make LODs (described in a previous post).

Hopefully this procedure will work for you too :)

EDIT 2012-03-03

After Skyrim updates some esm file will no longer work, the game will crash.
* esm that is dependent on the Skyrim.esm will work (example, the esp was loaded together with Skyrim.esm and then saved, then converted to an esm)
* esp will work
* As default the CK can only open one esm at the time, but you would like to open both your esm and Skyrim esm. You need to make a change in the SkyrimEditor.ini file in your /Skyrim folder. Add bAllowMultipleMasterLoads=1 under [General].


/E

Saturday, February 11, 2012

Height maps and making a new world

Some height map data:
Skyrims min height is -8192 and max 122878 Game Units. As a default, land is generated at -2048 GU, and water levels at 0 GU. Interestingly the Tamriel world space of Skyrim has a default land level of -27000 GU and water levels at -14000 GU. I have no idea why this is.
As before the max gray scale height of a height map was 75% gray, if the image was lovered to -8192 with TesAnnwyn (-h -8192 function). 


I will use the same height map that I used for Oblivion when making my world in Skyrim.  The image is a 16384 x 16384 px, 16 bit raw file. With the help of Lightwaves new  beta TesAnnwyn (v0.23) I can easily make a esp file that works in Skyrim.
The settings I used in TesAnnwyn: -i Skyrim - p 1 -b 16 -d 16384x16384 -x -255 -y -255 -h -2048 "x.raw"

EDIT:
use -h below -14000 to lower the land so water LODs work in Skyrim, I use -16048 to have 2048 units below sea level.

After making a esp I still need to convert it to an esm file, the Creation kit crashed when I tried to open a 16 quad world :) I used TESGecko's convert to master function and this worked fine.

To try my world in game, I named one cell, and put out a COCMarkerHeading in that cell, and saved this as a new plugin esp that I loaded together with my esm. In Skyrim press ~ (or §) to open the console, and type coc NameOfCell and this cell will be loaded.

Next step will be to make LODs...

/E


Thursday, August 25, 2011

Making the map

Size of the map

In Oblivion the map is divided in to quadrants, “quads”. One quad is 1024 x 1024 pix when making a height map. One quad is made up by 32 x32 cells, each 58.5 x 58.5m in the game, that’s over 1 800 x1 800 km in game for one quad. The original Oblivion game is made up of about 4 x 4 quads. I have read that 4 x 4 quads is the max size that the CS can load, due to the 2G RAM limit the program has. For me 4 x 4 quads are not big enough. I have also read that there is possible to make bigger maps, both at TESAnnwyn site and at the at the Middle earth forum. Some have made 8x8, 16x16 and even up to 20x20 quad maps. This requires some workarounds, because I can’t open an .esp with a map bigger than 4 x 4 quads as an active file without the CS crashing, sometimes so bad that I have restart the computer.

In the CS a file can be opened as an active or inactive file. The CS can open both esp and master esm file, but it can only save esp files. Opening a file as inactive can be good for some things but a problem is saving. The inactive file will only be saves as a new esp file, and this will only have the changes done to the file, not any other information from the original file. This is the same thing that happens when trying to save an esm file.

When working with really big maps like a 16x16 quad map, this can be opened as inactive without crashing the CS, but the saved changes will be in a separate file as I mentioned before. There is a tool that will solve the problems this introduces. TESGecko can convert between esp and esm and can also merge esp to esm. With this handy tool I can make a big 16x16quad map, in TESAnnwyn, covert it to a esm in TES Gecko, open it in the CS an, make changes like add things and so on, save as a new esp that I then merge with the original esm file and the changes will show in the game.
The map

The map I had worked on for my role-playing game was made as an old fashion map. From this I had also made a crude height map with different grayscale colors for the hills and mountains. What was needed now was an image with more detailed height information. I painted with a different grayscale color, so all the height information is in different layers, this making it easy to make changes. Now I can use the research I did on % gray corresponding to what height in m. The world I have planed is huge so drawing the map took several months. This is a part of the map in layers.

Every % grayscale step equals to 75m height change in the game, which will look really crappy. To even out the edges I first had to merge the layers and then I used a mixer brush tool in PS. This tool blends the two colors togetter, making the edge fussier.

Introducing realistic erosion in the map
There are several height map editors with erosion functions, among them the CS. I have tried GeoControl2. They have a free full trial version for 30 days. GeoControl2 can generate random maps, but it can also import images, like a 16-bit tif. The max image size is 4096 x 4096 pix. GeoControl will also show a 3D rendering of the map, great to get a good visual of the terrain. First we have the layered map vs the fussed out edge map. Both looks kind of bad, but no fear, that’s what GeoControl is for.


A problem is the fact I only have a gray color range between 100-75% gray. In GC this looks kind of flat. I need a full range (ca 100-0%) for the functions of GC to work well.

GeoControl2 has a lot of functions that I haven’t learned get. I’m mostly interested in the possibility to introduce realistic erosion. Some testing of the functions are in order :) I used the test hill I made earlier and run it with the different settings. The hill is perhaps not the best starting object to test for all the settings, but it gives a general idée of what happens.


I liked the mountain ridge, thin flow deep inverse, thin flow sharp and thin flow deep, so I used these on my map.


Looks a lot better now :)


Now I want to test out my map in game, the 4096x4096 image was saved as a tif in GeoControl, and then resaved as a RAW in PS. One thing I have not said before, the TESAnnwyn will flip the image vertically, so to get the right north in game I have flipped the image vertically first in PS, and then the TESAnnwyn will flip it back. On the construction set wiki, in the WORLD building 101 tutorial, at the end there is a good method for setting up a new start place for a player that is not in the original game. To use the new esp in game, when starting Oblivion chose DATA, then mark the esp/esm files to start, then start the game. This is an image from a terrain made from my map to a 4x4 quad terrain (image map size 4096x4096). The terrain looks nice but there is no distant terrain showing. These are called LOD, and must first be generated.


/E

Sunday, August 21, 2011

Making a Height map, part 1 – Height units

Many of the guides to make Height maps I have read were based on the use of Fractal mapper, TES4 Construction Set or GeoControl. These tools make new or random maps, which you can then change. I already had a world planed out and it felt like a lot of work to redraw everything again. I will start by going throught the trial and errors I have tested to figure out how to make my map functional in TES4 Oblivion. So I did a basic simple height map in PhotoShop/Gimp2. A height map is an image file where the color value corresponds to a height in the landscape. Black is low and white is high.
Height units used in Oblivion
This can be a bit confusing (not sure I have completely figured it out get). The Construction set wiki has a good over view.
Now I also have to mention a really useful tool TESAnnwyn, a program that can among other things converts height map images in to esp files (see Link list). It’s a lot faster than the CS (Construction Set) and avoids the painful CS crashes.
According to the TESAnnwyn help file, a 16-bit RAW image file has a range of 65536 (-32768 to +32767) TES Height Units (THU), 524 288 (-262 144 to +262 136) Game Units (GU) and 7 471m. 1 THU is 8 GU and multiplying GU by 0.1428767293691635 will give the height in cm.
Testing my Height map
I started by using a 16-bit grayscale RAW, that goes from 100% (black) to 3% (almost white). I made it by using the gradient tool in PS. After running it with the TESAnnwyn to make an .esp, I check it out in the CS with the height map editor (right). I got some puzzling effects, not a nice hill as expected.
Each color represent a height in THU, from 0-65535. If the height differens in the map is to great it introduses rips in the textures around 20 000 units. This makes the map starta at minimum levels instead of continuing up (dark blue).
The color map from the heightmap editor:
In TESAnnwyn it is possible to scale the height values with the –s function. I tried scaling with 0.125 (1/8), but as you see the height still hits the roof and starts at minimum, but just once (left, the dark lilac color). Scaling more 1/16 (-s 0.0625, middle) and 1/32 (-s 0.03125, right) does not fix this problem, only makes the height range more flat.
The only thing I can figure out that solves this is not using the full range of color in the original height map. I made a new RAW file ranging from 100% to 51% black. Now the slope is less, and I get the full 65 535 GU. The height still hits the roof and turns negative (left). With scaling of 1/2 (-s 0.5) and the use of another function, height alteration, -h of -8192 units, I have a height map that uses full range of GU and don't flip to min in height (right). According to the TESAnnwyn the height range of my map is -116 to 3544m without scaling and -116 to 1713m with. This is with the setting -h -8192, without this adjustment the map will flip to negative, and there will be nothing at sea level (-h - 4096).
Now I just have to see if this works with my real map :)
/E

PS.
Well it turned out I needed to do some more testing to make things work, see the next post.