Showing posts with label Skyrim. Show all posts

Saturday, January 5, 2013

[REL] Water plants and Ztrees rocks

It is almost like it is Christmas again, be course here is a double release for you :)
First of are the water plants and them we also have Ztrees rocks.

The water plants

I have mentioned before that I have been working on some new water plants, and now the long wait is over :)
There are three types of plants; lake and river plants for fresh water, kelp and algae for salt sea water and plants that grow on the shore. All these are simple low poly re-textures grass models. I have again used SparrowPrince Lush Grass models for some thicker variants.


You can download them here on Nexus.


There is an added surprise for you that I have not show here before.
Ztree have been working on several new plants and trees, and I have helped by making some additional textures. It has been a really nice collaboration with results of life like plants. One of them are new water lilies, and they are also released with the rest of the water plants :)

All in all there are 26 variants to choose from, including five different models with and without flowers, and different colors of flowers too. They look stunning in game, and we will use every opportunity to use them in Hoddminir.

As an optional file you can download a image library with jpg of the plants in game. These are really helpful to keep track of all the plant variants you can choose from when modding (I will add similar image libraries to the previous plants releases too).


Ztrees Rocks

There are 13 different rocks, all using 13 of my ground texture rock textures. I have to say I love these rocks. The have working collision and they are whole models so they can be turned any way you like, not like Skyrims original rocks that have holes in the bottom.

You can download them here on Nexus.


I hope you will enjoy these as much as we have :)
/E

Thursday, May 24, 2012

Making a 16bit height map without Photoshop

I have been asked many times how to make a height map for Skyrim without using Photoshop. Unfortionally Gimp 2.8 do not support 16 bit images that are needed to make a height map and I have been trying to find some other program to do this with, and also make raw files that TesAnnwyn can read.
A solution it seams is a good but ugly program I used to work with called ImageJ. It is a Java program developed for scientific image analysis, and I used to measure root growth of mutant Arabidopsis with it. But it can also do what I need for Skyrim world creation, and it is free :)

Work flow


First make the height map in Gimp, save as 8 bit Tiff (see previous post for some guidelines)
Download ImageJ.
Open in ImageJ, change to 16 bit under Image -> Type, save as RAW.
Import the RAW image of the height map in GeoControl, under Generatio -> Terrain Import -> "Raw (16bit) from Carrara".
 
After you run the filters and have a terrain you like, export as a 16 bit RAW file.

To make the esp run TESAnnwyn, and because the image is to bright you have to use the scaling function. Exactly what scaling factor to use depends on how bright/high your world is, try what works for your world.
TESAnnwyn command line:
TESAnnwyn.exe -i Skyrim -p 1 -b 16 -d 4096x4096 -s 0.2 -x -64 -y -64  -h -22192 -w NameOfWorldspace YourImage.raw
 -i sets the game, -p RAW format, -b 16 bit image, -d size in pixels, -s scales the height range of the image, -x and -y cell offset in x and y directions. (See original post on -h values and the effect on sea levels.)

If anyone have found a better program or solution let me know.
/E


Saturday, March 31, 2012

Making more plants for Skyrim - Part I: re-texturing

As part of the Hoddminir project I needed a lot more plant species, both grasses, flowers, bushes and trees. I don't know anything about making models so I will duplicate and re-skin some of the existing plant models. But first I need to do the plant textures I want.In this example I will make an Anemone as a grass that can be added to a ground texture.

In short these are the steps I will do:

Part I: textures

  • choose a appropriate existing model
  • make the texture
  • test that it looks good in game

Models

I'm going to re-skin an existing model, but to know what grass model to choose I need to know what planes the models have? What will fit with the plant I have in mind?

fallforestgrass02
fieldgrass01
tundragrass03
tundragrass04
beachgrass01
forestgrass01
To see the planes that the grass models are built from I changed the textures so that all of it would show, not just the plant part. This was done by making the alpha channel all white. The dds file has different channels, RGB channels and an alpha channel. The alpha channel will determine what part of the texture is shown.
If you want to know how all the grass models look, please download this file. It contains jpg images of all grass with all of the planes showing.

For this particular plant I chose the "tundragrass03" model and texture (after some trial and error).

Making your DDS textures

I have worked in Photoshop, and to be able to open .dds files I needed to download Nvidia dds plugin for Photoshop.

You can make a texture from scratch, or completely modify an existing texture.  To get the original textures unpack Skyrim.bsa, if you have not done this before, you can do it with for example BSAopt. The grass textures are found under Textures\landscape\grass in the BSA. Make a copy of the grass texture you want. I will use "tundragrassobj03.dds"

1. Open the dds file in PS with the settings Load Using Default Sizes, unchecked Load MIP maps.

2. I like to have a higher resolution than vanilla so I change the image size to 1024x1024 (normal is 512x512).

3. Now comes the creative part. I pasted in a picture I have of a flower, clean away all the surrounding nature, scale it to fit the size I want. In the beginning I fell for the temptation to use a lot of flowers, but less is more.

4. Keep the flowers and background color in separate layers for now. I painted the background in a shade of green, and another color matching the flowers around them. Some of the background color will show depending on the alpha channel.

5. To see only the plant in game and not the background you need to make/change the alpha channel.
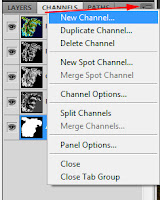
There are probably several ways to do this, here is how I do it. Click on Channels (next to Layers), if you used an existing texture dds file it already has an alpha channel, you need to paint it all black.
But if you are making a new alpha channel, click the right most symbol, select New Channel. Call it Alpha 1 and click "Masked areas", this will give you a black alpha channel. Have the alpha channel deselected for now.


6. Now go back to Layers and make a duplicate of the flower layer. Go to Filter/Blur/Average and make the layer completely white by enhancing the Brightness to max (Image/Adjustment/Brightness).

7. Select the whole layer (Ctrl A), copy (Ctrl C). Go to channels, select the Alpha channel, paste. You may have to move the alpha image down so it covers the flower image (press V to select the move tool, then move with arrows). When you are happy with the position you can deselect, and deactivate the alpha layer.
alpha channel

8. Delete the white flower level you just made (step 6). Flatten image, then save as .dds with these settings:
With these settings. the Alpha layer will be used, and it will make and save 10 MIP maps. MIP maps are lower resolution images that show when you see that object from afar.
EDIT:
To reduce the load on the graphic card it is important to save in the right format. There is an excellent forum post on this subject.
What save settings to use when: 
* Generate mipmaps
* Save textures with an Alpha channel (some parts of the image is transparent) as DXT3 or DTX5 and without Alpha channels as DXT1
* Save normals as DXT5

9. To test in game, take the .dds file you just made, name it as the original texture, in this case tundragrassobj03.dds and copy it to Skyrim\Data\Textures\landscape\grass. The texture will now override the original and show up instead of it in game. (Deleting this new texture will make the game show the original texture again.)

10. Open the CK and load your mod.

11. In the Object window (WorldObjects/Grass/Landscape) you can change the specific settings for your grass type, for me the "tundragrass03".
Density will determine how often the grass appears. At what Min and Max slope the grass will grow. The Position Range is how close grasses can be to each other. Wave Period determines how much the grass will move to simulate wind movement.
There is also a drop down menu on how the grass relates to water, in units below, above and so on. That can be very handy for underwater plants, or beach plants. 
If you want a thick growth of your plant, have a high Density and a low Position Range. Grasses looks really good with a high Wave Period, but most flowers will look like they are just shaking, so I lower this to 50.

12. You need to paint the ground texture "LTundra01" somewhere in your mod, it has the tundragrass03 grass associated to it. Or take another texture (Miscellaneous/LandTextures) in the Object window, double click on it and the LandTexture window will open. Drag the grass from the Object window (WorldObjects/Grass/Landscape) to the LandTexture window in the "Potential Grass" list.


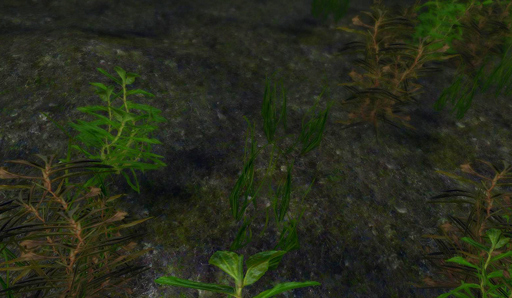
13. Save the mod and run in Skyrim to see how your plant looks.

Next step is to make permanent new models with the plants by re-skinning duplicated models, I will cover this in Part II, as soon as I have figured it all out :)

/E

Tuesday, March 27, 2012

Water

I have now made a height map I am pleased with and made LODs. Now comes the actual hard work... Populating the world with objects, generating landscape regions and fill all of those riverbeds with water. NPC and Quests, well that's a later problem.

I thought I start of with water. There are many different types of water, around 30, and that's a lot of water to chose from. To have a look at all the different waters you can find them in the Object window, WorldData, under WaterType. There are some different settings, like Color, Noice, Specular and Physical Properties. For example under Physical you can set the current of that water type under Linear Velocity. The X axis is in East (+x) West (-x) direction and Y is in North (+y) South (-y) direction.


How to change the water in a exterior cell:
  1. load your esp/esm
  2. select the worldspace in Cell View
  3. select the cell you want to edit
  4. right click on the cell name and chose Edit (Alternatively, under World, Cell, select worldspace, and the cell)
  5. here you can change water level, water type, linear velocity and angular velocity for that specific cell

The new water level may not always show up right away in the Render window, move to another cell and then back again, and it should show up.

Now this proses is slow, for a smaller world is manageable, but with Hoddminir size of 16x16 quads it feels really overwhelmingly slow.
We are thinking of making a program that would change water level height, type and perhaps linear velocity for a batch of cells at a time. This could be a help and save a lot of hour for a lot of modders.
If you would like to participate in the project, beta test it when we get to that point or even better know of a program with similar function, please let me know.

/E

Wednesday, February 22, 2012

.lod File Generator

For those of you who want to make your own .lod files but would rather not mess around with a hex editor I now present:

LodFileGenerator_v0.01
made by Geggakloss


------------
Description:
This is a simple command based program that can make a .lod file for Skyrim worldspaces without the use of a hex editor.
This file is needed in addition to the meshes and textures that make up the LODs to show in the game.
------------
Installation:
No installation needed, just run exe file.
------------
Use:
Run LodFileGenerator_v0.01.exe

The program will ask for:
1) Name of your worldspace
2) x coordinates of the lower left cell
3) y coordinates of the lower left cell
4) width of your world measured in number of cells

The program will create a "YourWorldspace".lod file in the same directory as the exe file.

Put the .lod file under Skyrim/Data/lodsettings (create this folder if it does not exist)

Exsample:
A world that starts at (-64,-64) in the lower left corner and ends at (64,64) has a width of 128 cells.
The name of the worldspace is test.
For this worldspace answer:
1) test
2) -64
3) -64
4) 128

-----------
EDIT:
If your world size in smaller than tamriel, you can use the tamriel.lod and rename it for your worldspace. 

Know issues: 
The .lod file generated will not work for worlds spaces smaller then 32 cells in width!

-----------
EDIT (2012-03-04)
New version out (v0.02), hopefully all issues are now fixed .

Enjoy!

/E and J

Friday, February 10, 2012

Skyrim - Image Library of Textures with 3D grass

Finally the Creation kit for Skyrim has arrived :)

One thing I do miss from Oblivion is all the diversity in the resources.  I really like the Skyrim theme, the tundras and snow, but I would also like to make lush forests and seas of green high grasses and flowers. As a comparison to a earlier post with the 3D grasses  of Oblivion, these are the vanilla Skyrim ground textures that has 3G grasses:
LCoastBeachGrass01 LFallForestGrass01 LFallForestGrass01NoFerns
LFallForestGrass01NoFerns LFieldGrass01 LFieldGrass02
LForzenMarshGrass01 LForzenMarshLichen01 LGrassSnow01
LPineForest02 LPineForest03 LReachGrass01
LTundra01 LVolcanicTundraDirt01
I hope someone makes more grasses, trees, flowers and ground textures. I'm not at good at making textures and models, but I guess I will have to learn :)

Edit
The amount of grass, that is the density can be set in the CK for each grass.


Comparison of a density setting of 10 to 70:


/E